| TheWoodcrafter.net |
 Copyright © 2004. |
| My Basic Projects |
| The Retro Section |
| Jr. Woodcrafter |
| My Work |
| Detailed Plans |
| About |
| Lathe Work |
| Safety |
| Hints |
| Pic Gallery |
| Links |
| Search |
| Home |
| Birdhouses |
| Guest Book |
| Contact Us |
|
|
||||||||
|
Robin's Nest Box
|
 |
||
| First, cut out the 5 pieces from the ¾'' stock. Next, cut out the three pieces from the ½'' stock. Now all your Junior Woodcrafter needs is the eight wood pieces, the directions, ten 1" brads, fifteen 1½" finishing nails (points slightly dulled), a hammer, one sheet of 150 grit sandpaper, a really cool workshop apron small enough for kids, and safety goggles. |
|||
| Construction. | |||
| 1. Attach the lower ends to the back. 2. Start two 1-1/2" finishing nails into the wider end of each end piece. Drive the nails to the point they are about to, or just barely, go all the way through. 3. Apply glue to the ends and nail them to the back (as indicated in drawing A) being sure to keep them flush with the edges on the back. 4. Apply glue to the bottom edges of the back and ends then stand it upright on the base as indicated in drawing B. 5. Hold the pieces together and turn the unit upside-down. 6. Support the assembly by standing it on the back. |
 |
||
 |
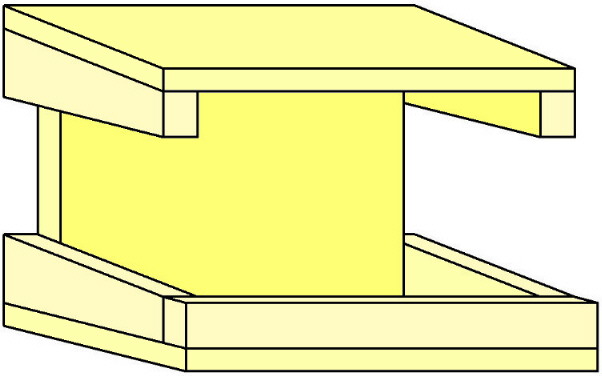
7. Drive three of the 1-1/2" finishing nails through the base and into the back as indicated in drawing E. 8. Support the assembly by hanging it over the edge of your workbench and standing it on the ends. 9. Drive one more 1-1/2" finishing nail through the base and into the each end and close to the back as indicated in drawing E. 10. Drive two 1" brads through the base and into each end as indicated in drawing D. 11. Put glue on one long edge of the front and position it in place as indicated in drawing C. 12. Drive two 1-1/2" finishing nails through the front and into each end as indicated in drawing C. 13. Glue and nail the roof to the two remaining end pieces as indicated in drawing F. 14. Use 1" brads to nail the front in first. 15. Start the 1-1/2" finishing nails near the back of the roof but do not drive them all the way through the roof. |
||
| 16. Check that the back fits properly between the two end pieces then complete drving in the 1-1/2" finishing nails near the back. 17. Place glue along the top edge of the back and about 1" down each side. 18. Position the roof assembly into place as indicated in drawing G. 19. Drive two 1-1/2" finishing nails through each ean and into the back as indicated in drawing G. 20. Drive three 1-1/2" finishing nails through the top of the roof and into the back. |
|||
 |
|||
| 21. Paint the entire item with exterior paint - enamel is best. 22. Visit the Birdhouse specs birdhouse specs page for information on how and where to mount the house. |
|||
| * * * * Click on any picture above to download a higher resolution picture. * * * * |
*********** WARNING***********
Read my page on safety before building this item.