|
|
|
The Woodcrafter Page© 2004 - all rights reserved.
|
|
|
|
Maple BREAKFAST
SET
Here is the orginal article straight
from
Book No. 4505, PRACTICAL DELTA PROJECTS
NEW & NOVEL THINGS TO MAKE,
BOOK 5
DELTA MFG. DIVISION
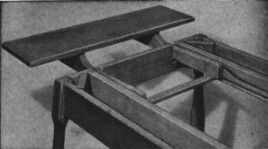
THIS practical set for breakfast nook
or dinette features a draw top table
which gives excellent accommodations with
a minimum of bother in making the
extension. With the top partly drawn, as
shown in one of the photos, the extension
makes a comfortable, if not mannerly, arm
rest for perusing the morning paper.
The manner in which the extension is made
is a bit different than the usual draw
top table. As shown in the lower photo,
each leaf is attached to two supports.
These supports are fitted with metal
pins, the pins riding in a pair of
grooves cut in the two longitudinal
members of the frame. |
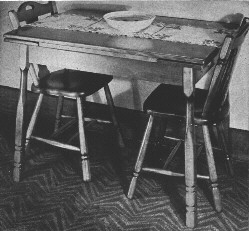
A delightful set in Colonial styling for
the breakfastnook or dinette. |
| In order to work
properly, it is necessary to fit the pins
in correct relation to the grooves. Best
results can be obtained if a full-size
drawing is made of the support and
bearer, as shown in Fig. 2 on pa
following page. If a paper pattern is
made of the support, the pattern can be
manipulated over the drawing of the
bearer thus checking the pin positions
and the shape of the track. It is obvious
that each track must have the same amount
of "lift" 7/8 in.) so that the
draw top will be level with the main top
when extended. Once the correct shape of
the track has been plotted, it is a
simple matter to cut a plywood pattern
and rout the grooves on the drill press. |
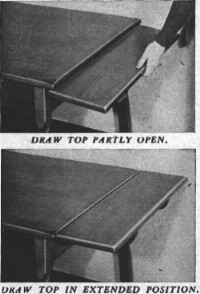 |
Fig. I shows the general
construction of the table framework,
which is quite simple. The ends of the
rails are cut with the saw table level,
but with the gage set over 3 degrees.
This gives the legs the required outward
tilt. The leg stock is 1-3/4 in square. |
 |
Each piece should be carefully
centered, since the turning is largely
confined to knocking off the corners.
After turning, the legs are cut to the
proper length with a compound cut, the
saw table being tilted 3 degrees and the
miter gage set over 3 degrees. Each leg
is held in place by means of a hanger
bolt fitting into a cleat which spans the
rails. This is a simple and substantial
method of construction. but can be
discarded in favor of dowelled or tenon
joints if desired. Through dowels are
particularly simple to fit, and, if
plugged, fit in nicely with the colonial
motif. |
|
Draw Top Arrangement Is
Simple and Foolproof
 |
Both bearers are sawed to fit and
routed to take the pins in the draw top
supports. The bearers are fitted into
shallow dado |
|
|
| cuts on the
inner side of the end rails,
adjacent to the openings which
take the supports. Each bearer is
held with two screws, one at each
end, inserted through the rail
near the top edge. Fig. 4 shows
the assembly of the |
A pattern of
the grooves in the bearer is made
to permit routing on the drill
press. Since the work is
symmetrical, the pattern need be
only a little over hall full
length. |
extension leaves. It will be
necessary to remove one of the
supports from each leaf to permit
fitting, after which the support
is again screw-fastened in place.
Two cross pieces are fitted in
place across the table, the main
top being screw-fastened to
these.
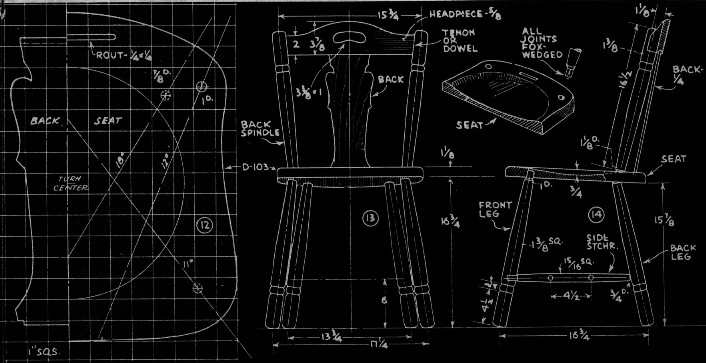
The chairs are made up as shown
in Figs. 12, 13, and 14. It is
advisable to draw a rough
full-size plan, showing all
centerlines, before sawing wood.
It will be noted that the legs
and back spindles are
approximately the same, but vary
a little in length. As with the
table, the turnings are worked
from the |
|
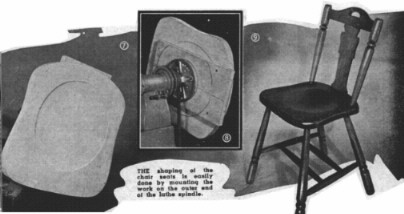
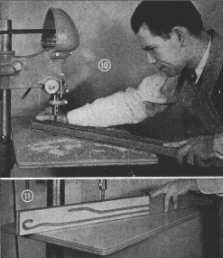
square into the round. The shaping of
the chair seats can be easily done by
mounting the work on the outer end of the
lathe, as shown in Figs. 7 and 8. After
turning, the edges are well sanded down,
especially toward the front edge.
Compound band sawing is required in
making the headpiece.
Drilling the various holes at compound
angles in the seat as required for the
legs and back Spindles, is the most
troublesome job in making these chairs.
The set-up is somewhat simplified by the
angles and lines shown in Fig. 12. In
each case, the drill table is tilted as
indicated. The line drawn from the hole
should be lined up with the drill. This
takes care of the compound angle without
the need of blocking up one edge of the
work.
The finish on all pieces is most easily
done with two coats of shellac followed
by a coat of wax. A water or oil stain
should be used to give the wood a
pleasing red-brown tone. The edges of the
table should be sanded to give the
appearance of wear. especially at the
comers. Two or three narrow strips of
felt should be glued on the underside of
the main top at either end so that when
the leaves are returned to position they
will not be scratched on the underside of
the main top |
|
*
* * * * * * * *
Click on the picture above to download a higher
resolution picture.* * * * * *
* * *
|
***********
WARNING***********
Read my page on safety
before building this item.
|