| TheWoodcrafter.net |
 Copyright © 2004. |
| My Basic Projects |
| The Retro Section |
| Jr. Woodcrafter |
| My Work |
| Detailed Plans |
| About |
| Lathe Work |
| Safety |
| Hints |
| Pic Gallery |
| Links |
| Search |
| Home |
| Birdhouses |
| Guest Book |
| Contact Us |
|
|
||||||||
|
Traditional
Occasional Table
Here is the original article straight from
Book No. 4507, PRACTICAL DELTA PROJECTS
NEW & NOVEL THINGS TO MAKE, BOOK 7
DELTA MFG. DIVISION
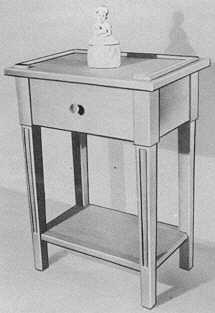 Photo No. 1 |
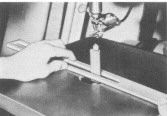
If you started building the traditional series of furniture designed by Whitcomb, this is the occasional table for that set. Other pieces to follow will be pull up chair, and cellaret bar. Square stock 1-7/8 x 1-7/8 is required for the four legs. Since this size is not readily available, glue up a plank of ¾ inch thick stock by ripping eleven pieces 2 inches wide by almost 25 inches long. This sliould give you enough maerial for the four legs, Plus two 1/8 inch hick pieces for the overlay. (Photo #3. ) |
|||||||||||||||||||||||||||||||||||||||||||||||||||||||||||||||||||||
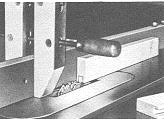
| By making shoulder cuts 5¾ inches from the end of each leg 1/8 inch deep, you can then draw the taper lines on two sides of each leg and cut these on the hand saw. Be sure to save the cutaway stock from the first two cuts and tack them back on with thin brads. Then make the two final cuts (Photo 2 ) | 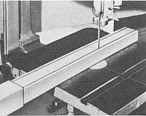 Photo No. 2 |
|||||||||||||||||||||||||||||||||||||||||||||||||||||||||||||||||||||
| Note: On the face side only of the two front legs, cut the taper 1/8 inch deeper to allow for overlav. (See Fig. 1 on drawing ) After hand sawing. clean the surfaces with a hand block plane. The overlay is cut and sanded on the scroll saw (Photo #3 and #4) and glued in place. Make sure you have a true surface on the leg to insure a neat glue joint. |
|
|||||||||||||||||||||||||||||||||||||||||||||||||||||||||||||||||||||
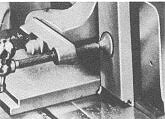
| Bore the dowel holes on the drill press in the side and back rails as indicated in the drawing. Use steel center pins for locating exact mating holes in the legs. Before assembling the table, notch out the shelf support grooves in the legs with the dado head. (See Photo # 5. ) | 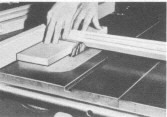 Photo No. 5 |
|||||||||||||||||||||||||||||||||||||||||||||||||||||||||||||||||||||
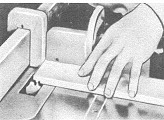
| The shelf also must be notched to fit the groove in the leg. (Fig. #2 and #3,) This is done by making two saw cuts on the circular saw with a V-Block, as a rest, Fig. #4. Finish cutting the corners on the band saw. When fitted properly it is ready for gluing. | 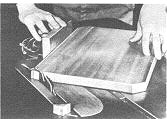 Photo No. 6 |
|||||||||||||||||||||||||||||||||||||||||||||||||||||||||||||||||||||
|
The drawer frame is assembled with short mortise and tenons. (Photos #7 and #8. ) The two outside cutters from the dado set will make the mortise or groove. Same dado set-up will cut the short tenons. After frame has been assembled and glued together, it is screw fastened to the side and back rail with No. 8 x 2 inch flat head wood screws. | |||||||||||||||||||||||||||||||||||||||||||||||||||||||||||||||||||||
|
Drawers can be constructed with either the conventional 1/8 inch tongue and groove, Fig. #5 on drawing, or with the special drawer joint knives #35-110. In the latter, one set of knives makes both the tongue and the groove, see Fig. 6 and photos #9 and #10. | |||||||||||||||||||||||||||||||||||||||||||||||||||||||||||||||||||||
Bill of Materials
|
Sand all parts with 3-0 and 6-0 garnet paper; be sure to break all sharp corners. Finish the project to match your other pieces. If you left them natural, apply two thin coats of white shellac and follow with a coat of rubbed effect varnish. Waxing occasionally will retain its satin finish and preserve it as well. | |||||||||||||||||||||||||||||||||||||||||||||||||||||||||||||||||||||


 |
 |
| * * * * * * * * * Click on either drawing above to download a higher resolution picture. * * * * * * * * * |
*********** WARNING***********
Read my page on safety before building this item.