| TheWoodcrafter.net |
 Copyright © 2004. |
| My Basic Projects |
| The Retro Section |
| Jr. Woodcrafter |
| My Work |
| Detailed Plans |
| About |
| Lathe Work |
| Safety |
| Hints |
| Pic Gallery |
| Links |
| Search |
| Home |
| Birdhouses |
| Guest Book |
| Contact Us |
|
|
||||||||
|
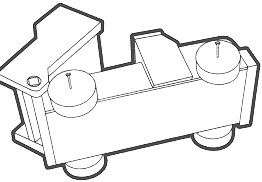
Dump Truck
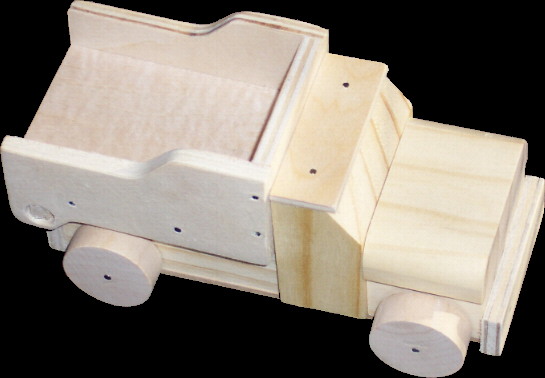 The actual finished item. |
Here's a cool little dump truck. I suugest you cut out the pieces to this project and let your Junior Woodcrafter assemble it for an easy-fun project. This simple project can be left unfinished or you can stain or paint it. The Jr, Woodcrafter actually made this item at the March Lowe's children's workshop. |
| Start by downloading the full scale drawings in the Acrobat file by clicking on the link below. Cut all the pieces as indicated in the drawings, cut out the axle notches, drill the holes in the carge sides, and predrill all the nail holes with a very small bit. The axles are 2½" long ¼" diameter dowels and the wheels are cut from a 1-1/8" diameter dowel. The cab roof is 1/8" plywood, the body bottom is cut from 1/8" masonite board, the three main body parts from scrap pine 2x4s, and the rest from ¼" plywood (or stock). You may wish to print up window and door decals on self sticking labels (look on the web for pictures of cars) or let the builder(s) paint the truck. |
|
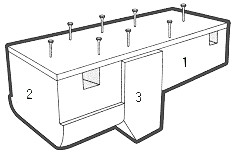
| The Jr Woodcrafter will need the seventeen (17) project pieces, the directions, twenty-eight (28) ¾" finishing nails, one sheet of 150 grit sandpaper, a really cool workshop apron small enough for kids, and safety goggles. | |
| Construction. | |
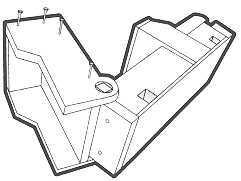
| 1. Locate and pre-nail the three closest nail holes to the back and front of the Body Bottom using six nails. 2. Attach the Bed to the Body Bottom. 3. Locate the Hood block and attach if to the Body Bottom by finishing nailing the nails in the pre-drilled holes. |
 |
| 4. Start two nails in the remaining holes of the Body Bottom. Locate the Cab block and attach it to the Body Bottom. 5. Locate the Cab Roof panel and start two nails in the pre-drilled holes. Align the Cab Roof panel with the nail holes on the Cab Block and attach it to the Cab Block. |
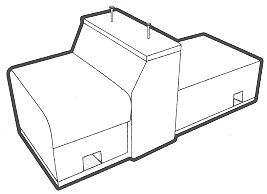 |
| 6. Locate and pre-nail the Hinge panel using two nails. Attach the Hinge panel to the back of the Bed by finishing nailing the nails in the pre-drilled holes. 7. Start two nails in the pre-drilled holes of the Bumper and attach the Bumper to the Hood Block. |
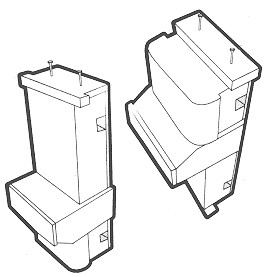 |
| 8. Locate a Cargo Side panel and start four nails in the pre-drilled holes. Attach the Cargo Bottom panel to the Bed Panel. 9. Locate the Cargo Front panel and attach it to the Cargo Side panel by finishing nailing the two nails in the pre-drilled holes. |
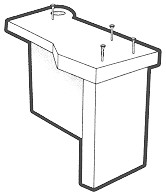 |
| Assemble the cargo section in place on the truck. 10. Locate the second Cargo Side panel and align the pre-drilled holes to the bed of the truck, Attach the second Cargo Side panel using four nails in the pre-drilled holes. |
 |
| 11. Locate the two Wheel Axles and, only on one side, attach a wheel to each axle by nailing nails in the pre-drillecl holes. | 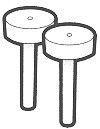 |
| 12. Slide the Wheel and Axle assembly through the Dump Truck body. Turn the Dump Truck on its side and attach the remaining two wheels to the axles. Sand any rough edges to smooth out and complete your Dump Truck. |
 |
| * * * * Click here the picture above to download the drawings as an Adobe Acrobat (pdf) file. * * * * |
*********** WARNING***********