| TheWoodcrafter.net |
 Copyright © 2004. |
| My Basic Projects |
| The Retro Section |
| Jr. Woodcrafter |
| My Work |
| Detailed Plans |
| About |
| Lathe Work |
| Safety |
| Hints |
| Pic Gallery |
| Links |
| Search |
| Home |
| Birdhouses |
| Guest Book |
| Contact Us |

|
|
|||||||||
|
Snowman Napkin Holder
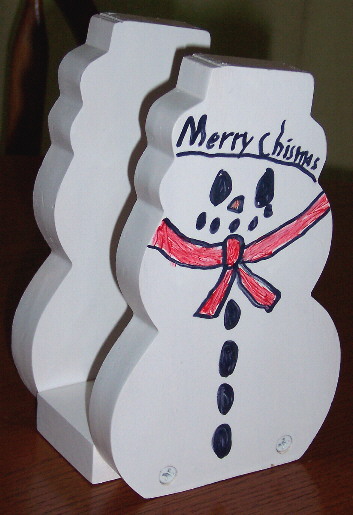 The actual finished item. |
Here's a cute holiday project. I suggest you cut out, shape, drill, and spray paint the pieces to this project then let your Junior Woodcrafter assemble and draw on it for a fun - easy holiday project. This simple project can be left unfinished or you can stain or paint it. The Jr, Woodcrafter actually made this item at the May Lowe's children's workshop then spray painted it flat white and used permanent markers to draw the features. |
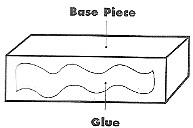
| Start by downloading the full-scale drawings in the Acrobat file by clicking on the link below. Cut all the pieces as indicated in the drawings and drill the screw holes in the sides. The base piece is 1" wide by 3" long. All parts are cut from ¾" planking. |
||
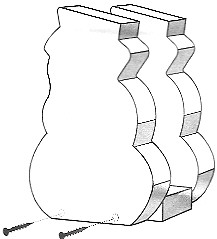
| The Jr Woodcrafter will need the three (3) project pieces, the directions, four (4) 1½" sheet rock screws, one sheet of 150 grit sandpaper, a really cool workshop apron small enough for kids, and safety goggles. The features are best if drawn on with colored permanent markers. | ||
| Construction. | ||
| Sand off all rough or sharp edges before painting or construction. 1. Stand one snowman upright on the table. 2. Put a thin line of glue along one side of base piece. 3. Place the glued side centered on and against the back of standing snowman. |
 |
|
| 4. Using a Phillips screwdriver, and two screws, screw the snowman to the base. 5. Squeeze a thin line of glue along back the of the base. 6. Center the second snowman against the glued edge. 7. Screw this snowmam into the base too. 8. For best results, allow the glue to dry overnight before painting your Snowman Napkin Holder. See decorating instructions above. . |
 |
|
| Decorating. | ||
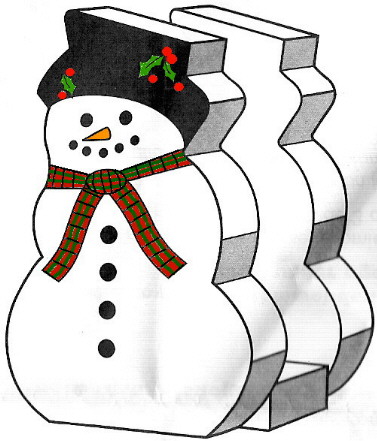
| Colors: White, Black, Red, Green and Orange
1. Trace the pattern onto the snowman. |
 |
|
| * * * * Click here the picture above to download the drawings as an Adobe Acrobat (pdf) file. * * * * |
*********** WARNING***********