| TheWoodcrafter.net |
 Copyright © 2004. |
| My Basic Projects |
| The Retro Section |
| Jr. Woodcrafter |
| My Work |
| Detailed Plans |
| About |
| Lathe Work |
| Safety |
| Hints |
| Pic Gallery |
| Links |
| Search |
| Home |
| Birdhouses |
| Guest Book |
| Contact Us |
|
|
||||||||
|
Here is the original article from the
May - June 1955 Deltagram
ROCKWELL MANUFACTURING COMPANY - A DELTACRAFT PULICATION
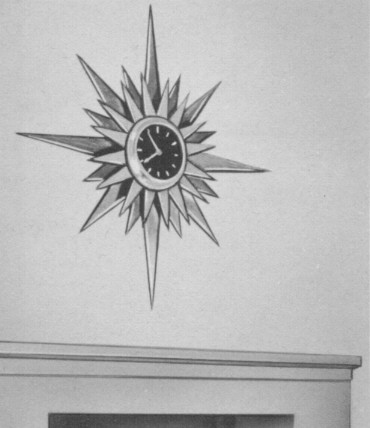 Photo #1 |
CONSTELLATION Wall Clock |
 Photo #2 To conserve on material, lay out the star sections on a piece of ~A' inch plywood 24 x 25 inches. The half sections are glued together when assembled. |
Here is a decorative, practical project for your living or dining room that will harmonize with traditional or modern furnishings. Begin the project by making the clock mechanism box. This can be made of solid pine stock or 3//8 inch ply-wood. Use 1/8 inch by 1/8 inch corner tongue and groove joints. The back is made of ¼ inch plywood set in a ¼ inch rabbet as shown in the drawing. The three star sections can be cut from a piece of ¼ inch plywood 24 x 25 inches, as shown in Photo No. 2. Note that the front and center sections are drawn in halves on this panel. Since all three sections are glued together these half sections will not affect the design of the clock. Details for laying out the star sections are given in Fig. Nos. 3, 4 and 5. The opening on the back section is cut out on the scroll saw, see Photo No. 3. The clock face is made of 1/8 inch tempered pressed vood. The face moulding is made of pine and is turned with a cove shape on the lathe, see Photo No. 4. The face and moulding are glued together and nailed in place over the front star section. The clock mechanisin is inserted in the box case from the back. The back cover is screw fastened to the case with #4 x 5/8 inch flat head wood screws. A slotted hole is cut in the back cover to make it easier to hang the completed clock (see Fig No. 5). The hour markings and the clock hands are made of 22 gage aluminum. |
|
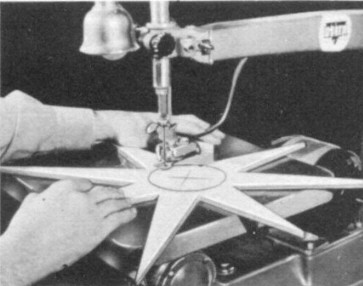 Photo #3 Since the back section is one piece, the center opening is cut out on the scroll saw using the Delta =92 blade with the machine running at its highest speed or 1725 rpm. |
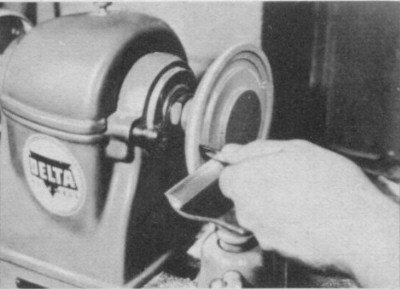 Photo #4 ThThe above photo shows the face rim or moulding being turned on the lathe, The final cut is being made with a cuf-off lathe tool. Do not cut all the way through since the inside portion is cut out on the scroll saw. |
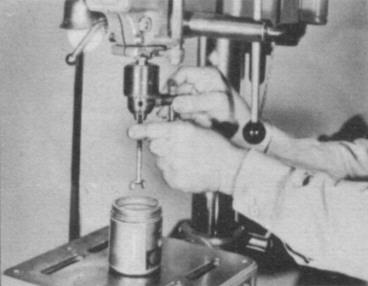 Photo #5 A '/~ inch wing nut on a 1~ inch rod mounted in the drill press chuck is used for mixing the gold-gilt point. This keeps the paint properly mixed while pointing the clock project. |
| When assembling the star sections be sure the points of the upper section are in the center of the star points of the section below, (see assembled sections in the drawing Fig. No. 1). Seal the entire project with two thin coats of white shellac. The outer face rim, or moulding, the stir sections and the outside of the clock case should be painted with a gold gilt paint. To get satisfactory results in using the gilt paint, keep it well stirred. A good way to accomplish this is to use a ¼ inch wing nut on a ¼ inch rod, inserted in the drill press chuck, (Photo No. 5). With the drill press running at its lowest speed, the gilt will remain property mixed for good painting results. The face should be painted with flat black enamel and when thoroughly dry, the hour markings should be glued in place. |
||
|
* * * * Click on the drawings above to download a higher resolution picture. * * * * |
*********** WARNING***********
Read my page on safety before building this item.