| TheWoodcrafter.net |
 Copyright © 2004. |
| My Basic Projects |
| The Retro Section |
| Jr. Woodcrafter |
| My Work |
| Detailed Plans |
| About |
| Lathe Work |
| Safety |
| Hints |
| Pic Gallery |
| Links |
| Search |
| Home |
| Birdhouses |
| Guest Book |
| Contact Us |
|
|
||||||||
|
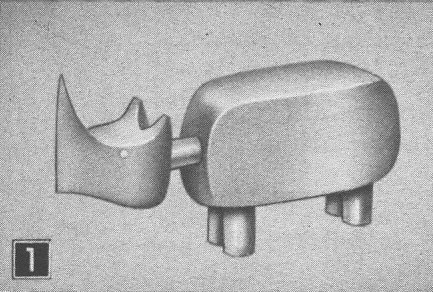
NOAH'S ARK RHINO
![]()
| The wonderfully familiar story of
Noah's Ark was the starting point for a very
interesting hobby. It involved designing and
building an educational toy that would capture
the heart of every child, and it led to free form
sculpturing on a power tool. An entertaining
project to make, and it calls for creative
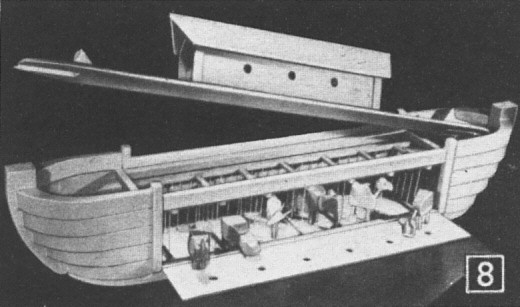
expression in one of the oldest art forms. Mr. Richard L Felver, an Industrial Designer who teaches at Carnegie Institute of Technology, made the toy Noah's Ark for his little daughter, Sally, aged 5. Sally and all the children in the neighborhood are just fascinated with it. Although there are plans for the entire project here, Mr. Felver says the most fun comes from using your own imagination in sculpturing the animals. The ark and six animals are shown on the following pages. The ark itself is not difficult to build, but it does have quite a bit of thought behind it. It is large enough to keep a child's interest for many hours at a time, yet it can be easily moved about. It is ruggedly constructed to take a lot of hard use. The removable top deck and the large hinged door satisfy a child's inquisitive urge to get to the "inside" of things. There are steps leading down from the top deck to the animal stalls and a passageway behind the stalls is provided to show how the animals are fed from inside the boat. The toy is very nice for teaching a child not only the story of Noah's Ark, but about the various animals, and about boats in general, and the many other things he will have questions about.
The band saw has long been used for curve cutting in a single plane. When you have the curves intersect one another in different planes you get form and shape. |
By varying either the curve or
the angle that it crosses another curve, you will
have an altogether different result. The artistry
comes in when you visualize the effect you will
achieve by using various cuts.
such as the elephant's trunk or the camel's
hump. There are drawings and photographs showing
how each of these animals was made. Use them to
get started on sculpturing with power tools. As
you become more proficient you will find many
uses for your other power machinery in
sculpturing.
Wagon and plans for making pull-toys out of the animals shown in this issue. It's not too early to start with this Noah's Ark and we feel sure you will get a lot of enjoyment out of sculpturing on a power tool. |


 |
* *
* * * * NOTE * * * * * I am posting several related articles tied to ' free form sculpturing on a band saw' and to the Noah's Ark toy. |
 Before making any cuts on the head of the rhino, make the angle cut first on the block as shown in the side view (see drawing). |
 The second cut on the head of the rhinoceros is made on the band saw using a 1/8 inch blade. Note how the piece rests on the angle face while making this cut. |
 |
| Before making any cuts on the head of the rhino, make the angle cut first on the block as shown in the side view (see above). Proceed with the balance of the cuts as indicated. Here again, break all sharp corners and sand the toy thoroughly. Paint entire toy gray. |
| * * * * Click on the drawings above to download a higher resolution picture. * * * * |
*********** WARNING***********
Read my page on safety
before building this item.