TheWoodcrafter.net
The Woodcrafter Page
Copyright © 2004.
My Basic Projects
The Retro Section
Jr. Woodcrafter
My Work
Detailed Plans
About
Lathe Work
Safety
Hints
Pic Gallery
Links
Search
Home
Birdhouses
Guest Book
Contact Us

The Woodcrafter Page© 2004 - all rights reserved.
 
Ad space available here.


Here is the orginal article from the
July-August 1970 Workbench Magazine


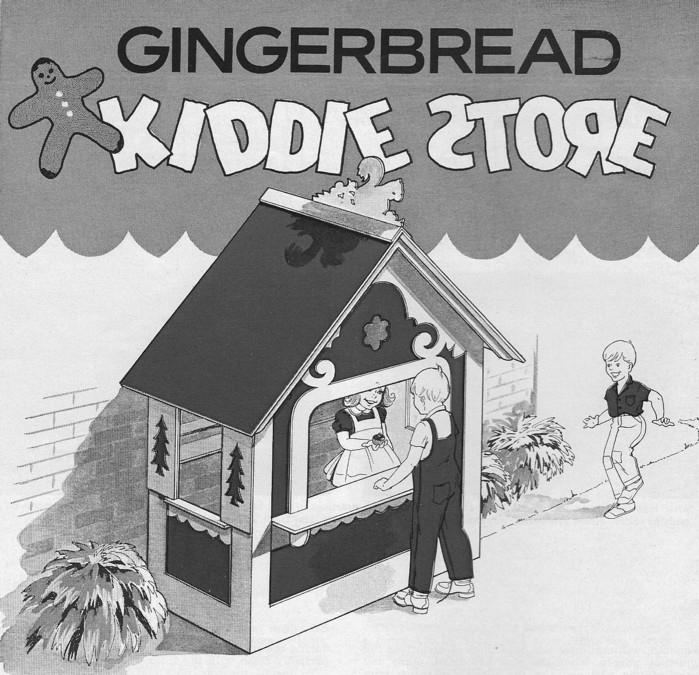
There are touches of magic, with perhaps a hint of Hansel and Gretel, in this charming little store that is right out of the land of make-believe. Set up indoors or out, the store can be stocked with make believe groceries or with homemade cookies, candy, lemonade or soft drinks for the hungry and thirsty neighborhood youngsters to enjoy. You can make it a start in the business world by using play money as currency.
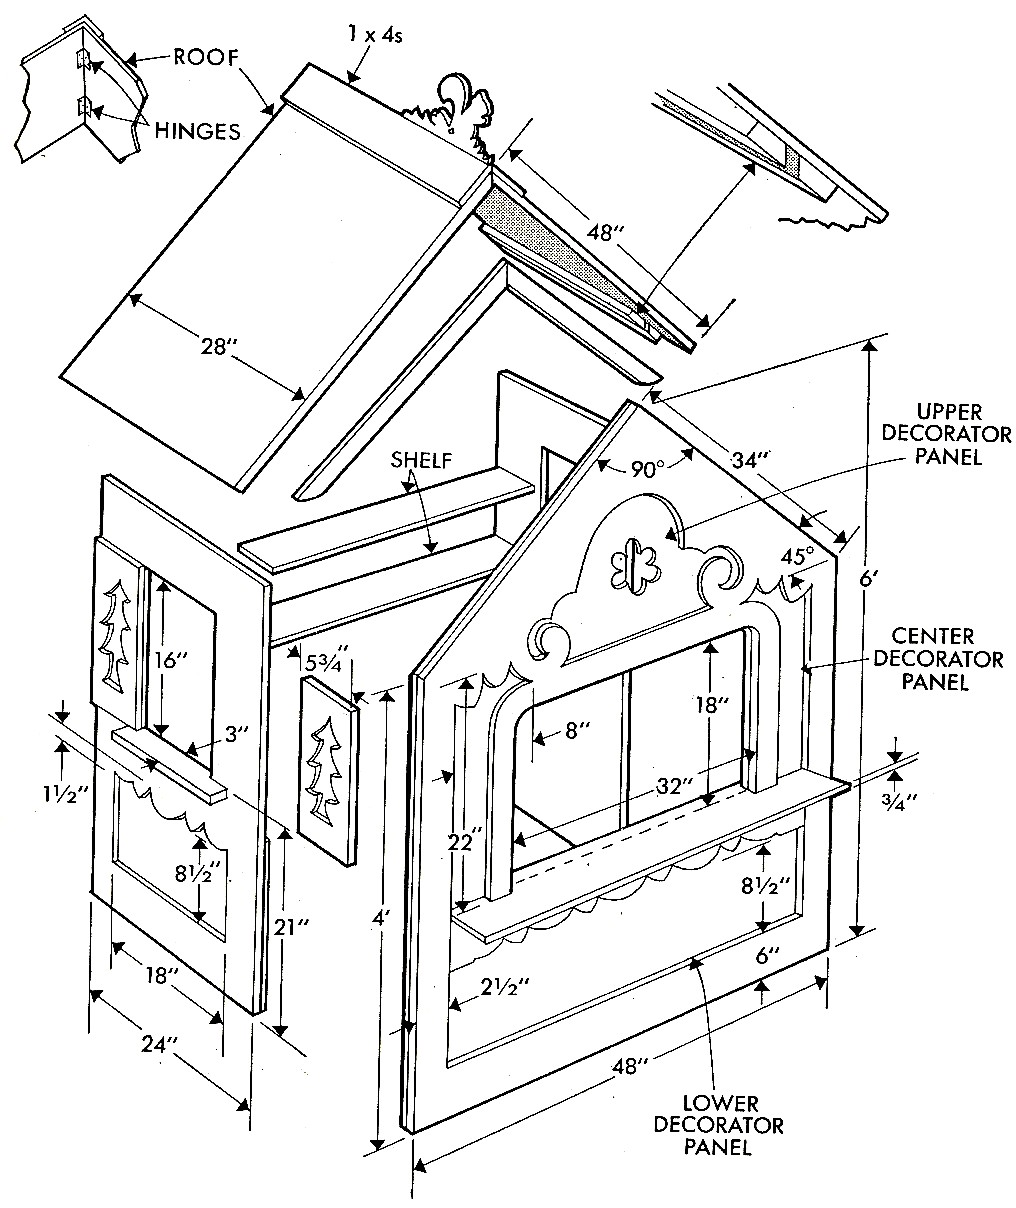
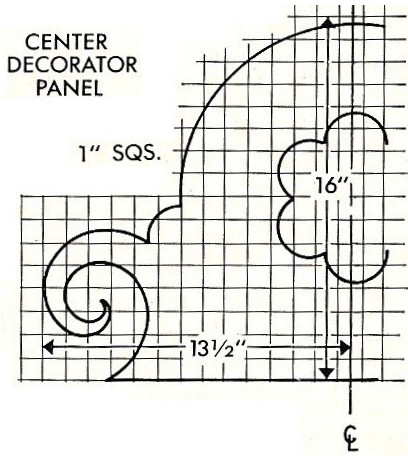
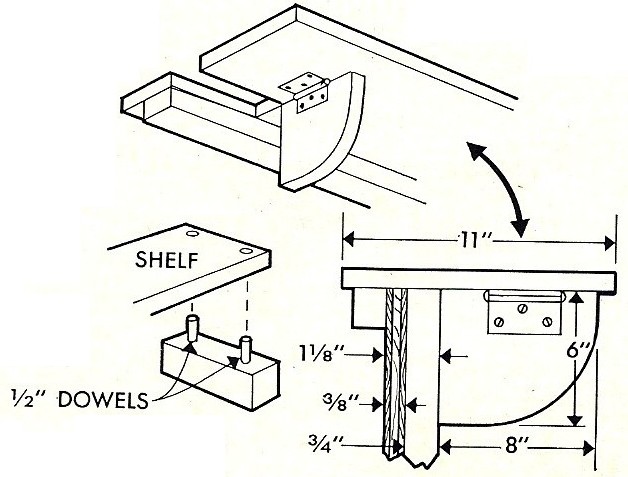
The store is a fun project that is easy to build. Two 4 x 8-ft. panels of 3/8-in. plywood are required, plus a few pieces of solid stock for the counter, windowsills and shelves.
It's best to leave the back of the building open, so it can be placed against a wall. The full-width shelves at the back, "locked" into cleats with dowels, reinforce the structure, and the roof with its deep cleats holds the walls firmly.
The front of the store and each side wall are shaped and assembled separately. When complete, the three components are hinged together so they fold into a thin, compact "package" that can be stored easily. The two roof panels are also hinged so they fold together. The 1 x 4 ridge boards provide added strength to the roof, and extra thickness for driving the screws that hold the hinges. When the Kiddie Store is made in the manner described it can be set up in a few minutes and just as easily folded away for storage.
The 4 x 6-ft. front panel and. one 2 x 4-ft. side wall are cut from one 4 x 8-ft. sheet of plywood, while the other side wall and both roof panels are cut from a second sheet. The waste from window openings and each side of the triangular-shape gable is used for the ornaments, shutters and trim.
The removable counter is made up from l-i n . stock, the ends notched to fit snugly around the window frame. A cleat is fastened in back, as indicated in the detail (a 1 x 2 or 2 x 2) to hold it in position and two hinged brackets are added to support the front portion of the counter in the event any of the customers is a heavy "leaner."
The full-length shelves at the back (two or three, depending on your preference) are lengths of 1 x 4 with dowels glued near the ends in blind holes that fit in holes in cleats on the side walls.
Window openings in the side walls have windowsills 3 in. wide fastened permanently in place. The inside edge of the sill is flush with the inside of the wall to allow it to fold flat against the front. You can make one sill removable so the other side wall folds flat against it.
Shutters on each side of the windows are merely ornamental. The design is cut with a jig or saber saw and the shutters are bradded and glued permanently to the side walls. The ornament on the peak of the roof is fitted with dowels in the lower edge. These dowels fit in holes bored in the ridge boards. The ornamental panels are glued and bradded in place as indicated.
When the carpenter work is complete, sand all parts, both inside and out, and apply a prime coat of lead-free house paint. When the prime coat is dry, fill any nail holes, cracks or other defects with putty, sand smooth and apply the finish paint. It may take two coats.
The inside of the store is a pale blue, the counter is a light tan, the roof bright red and the outside walls a brilliant yellow. The trim, shutters and ornaments are given a final coat of white to provide a contrast in color.The builder can, of course, paint the store any color or combinations of color he chooses. We do suggest a quality house paint or trim enamel so the structure can be hosed down or washed easily. As a final touch you can apply plastic laminate to the counters.  


Materials List 


3/8" Plywood

Side, 24" x 48", 2 req'd.

Front, 48" x 72", 1 req'd.

Roof Panel, 28" x 48",2 req'd.

¾" Plywood or 1" Solid Stock

Roof Cleat, 1" x 1" x 24", 2 req'd.

ripped diagonally to create 4 pieces.

Shutter, 5¾," x 16", 4 req'd.

Side Counter, 3" x 18", 2 req'd.

Front Counter, 11" x 43", 1 req'd.

Squirrel Cutout, 12" x 18", 1 req'd.

Ridge Boards, 1 x 4 x 28", 2 req'd.

Side Decorator Panel. 10" x 18", 2 req'd.

Front Decorator Panel, lower, 10" x 43", 1 req'd.

Front Decorator Panel, upper, 16" x 27", 1 req'd.

Front Decorator Panel, Center, 8" x 22", 2 req'd.

Front-Counter Bracket, 6" x 8", 2 req'd.

Shelves, 1 x 4 x 47¼", 3 req'd.


Right-click here to download the drawing as an Adobe Acrobat (pdf) file.

* * * * Click on the drawings above to download a higher resolution picture. * * * *

*********** WARNING***********
Read my page on safety before building this item.