|
|
|
The Woodcrafter Page© 2004 - all rights reserved.
|
|
|
|
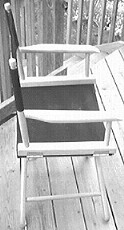
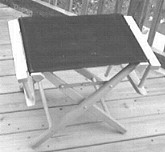
Here is a really nice,
easy to make, folding director's chair.
Folding
Director's Chair.
|
Detailed
Instructions
***********
WARNING***********
Read my page on safety
before building this item.
***********
N O T E ***********
Some of the hardware for these
chairs is difficult to come by.
Your best bet is a local hardware store or simply search
the internet.
I no longer have a source for the hardware so please do
not bother to email me for help in locating it.
It is possible to modify some strap hinges but they are
not as stable as the offset hinges called for.
Materials needed:
While any choice of woods will work, I
recommend 3 types of wood for the project: a light maple,
oak, or hickory.
Six foot of 2" x 3" lumber.
Five board-foot of 1" thick (actual finished size)
lumber (at least 2-1/2' long).
Two 3/4" dowels (3' long).
Four 1/4" lagbolts (2" long), 8 flat washers,
and self-locking nuts.
Two 3/8" lagbolts (3" long), 2 flat washers,
and self-locking nuts.
Four heavy offset hinges.
Two 9" locking supports. Available at Rockler.com by
clicking here.
Assorted sandpaper.
Exterior wood finish.
1/2 yard of heavy canvas material & heavy duty
thread.
Construction:
* * * * * N O T E * * * * *
The dowels in most pieces can be replaced by
turning the peices on a wood lathe after allowing
the extra length in the respective ends of the
pieces being turned. This results in a stronger
and better looking final piece. |
- First, cut out the four legs. They
measure 1" thick by 2" wide by
24-3/4" long.
- Locate the center of the top end of each
leg and drill a 3/4" hole,
1-1/2" deep for a 3/4" dowel.
- Locate the hole for the foot rest of each
leg 5" from the bottom and drill a
3/4" hole 1" deep for the foot
rest.
- Locate the hole for pivot pin of each leg
13" from the bottom and drill a
3/8" hole through the leg.
- Locate the hole for the knife hing of two
legs 5" from the top and drill a
1/4" hole through the leg. These
legs will be the outer legs.
- Taper each leg from a 2" width to
1-3/8 at the ends. The taper on each end
should be 8" long.
- Cut the small bevel on the bottom of each
leg as shown in the drawings.
- Sand all long edges to a rounded shape.
- Cut out the two seat sides. They measure
2-1/4" wide by 1-5/8" thick by
14-5/8" long. (2" x 3"
lumber)
- On the bottom of one seat side, locate
the holes for the dowels that secure the
legs 3-1/4" from the ends and drill
a 3/4" hole, 1" deep for a
3/4" dowel.
- On the bottom of the other seat side,
locate the holes for the dowels that
secure the legs 1-3/4" from the ends
and drill a 3/4" hole, 1" deep
for a 3/4" dowel.
- Cut the bevel along each side piece to
create the top edge as indicated in the
drawings.
- Cut the notch 5/16" by 3/4" as
indicated. Use a router (making multiple
passes) if you do not have a table saw or
circular saw with appropriate
accessories.
- Cut two 3/4" dowels (one
13-3/4" long & one 16-1/4"
long) for the foot rests.
- Now cut two 3/4" dowels 7" long
for the arm rest supports.
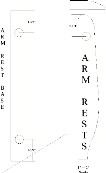
- Cut out two arm rest bases. They measure
1-1/4" thick by 1-11/16" wide
by 15-5/8" long. (2" x 3"
lumber)
- Locate the holes for the dowels that
secure the arm rest 1-5/8" from each
end and drill a 3/4" hole, 1"
deep for a 3/4" dowel.
- Sand only the upper edges to a rounded
shape as shown in the end view of the
drawings.
- Cut out the two arm rest. They measure
1" thick by 2-1/4" wide by
15" long.
- Locate the center of the back of each arm
rest and drill a 3/4" hole, 1"
deep for a 3/4" dowel.
- Locate and drill a 1/2" deep -
3/4" hole in the bottom of the arm
rest 2-1/4" from the front edge for
a 3/4" dowel.
- Cut the curves and tapers as indicated in
the drawings.
- Sand all long edges to a rounded shape.
- Cut out the two back supports. They
measure 1" thick by 1-3/8" wide
by 15-1/4" long.
- Locate the center of bottom of each back
support and drill a 3/4" hole,
1" deep for a 3/4" dowel.
- Locate and drill a 1/2" deep -
3/4" hole in the front of each back
support 6-7/16" from the bottom for
a 3/4" dowel.
- Sand all long edges to a rounded shape or
turn them on a wood lathe. Shape the tops
of the backs on a lathe, if desired but
do not turn them smaller than 1".
- Cut two 7/16" long pieces from the
3/4 dowel and drill a 3/8" hole
through the center of each. These will be
the pivot pin spacers.
- Cut two fabric supports. They measure
1/4" thick by 5/8" wide by
14-1/2" long.
|
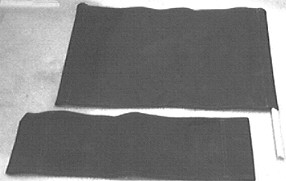
- Make a canvas chair back. The finshed
back measures 7" by 21-1/2"
with 2-1/4 sleeves (to slide over the
back supports) on both ends.
- Make a canvas chair seat. The finshed
seat measures 15" by 22" with
1" sleeves (to slide over the fabric
supports) on both ends.
|
 |
| Assembly: |
- Cut two 1-1/2" lengths of 3/4"
dowel then glue and dowel each arm rest
to each back support.
- Cut two 2" lengths of 3/4"
dowel then glue and dowel each back
support to each arm rest base.
- Glue each 7" long arm rest support
(step 15) between each arm rest &
each arm rest base.
- Cut four 2-1/2" lengths of 3/4"
dowel then glue and dowel the legs to
each seat side.
- Glue each foot rest (step 14) between
each set of legs.
- Clamp all assemblies tightly and allow to
dry overnight.
- Insert the 3/8" lag bolts through
each outer leg (head to the outer side),
add a washer and tighten the nut to 'set'
the head into the wood.
- Remove the lag bolt then position the
inner leg set inside the outer legs.
- Insert the lag bolt, adding the spacer
(step 28) between the outer & inner
leg, then the flat washer and the nut.
|
 |
- Install the locking knife support to the
inner side of the outer leg with a flat
washer between the support and the wood.
It should fold up, not down.
- Locate and install the other end of the
locking knife support to the outer side
of the inner leg with a flat washer
between the support and the wood so that
the distance from the OUTER
edges of the two arm rest base is exactly
21-1/4".
- Cut off all bolts even with the locking
nut then file or grind it smooth and
flush with the nut.
- Apply a thin dab of clear silicone caulk
over the nut & bolt.
- Insert the fabric supports into the
sleeves of the seat.
- Mount the offset hinges 2-1/2" from
the end of the arm rest base as indicated
in the drawings.
- Install the seat by sliding the ends into
the notch between the hinge and the arm
rest base.
- Secure the arm rests to the offset
hinges. Allow them to swing slightly open
while installing to result in a tight fit
later.
- Slip the back over the top of the back
supports.
- Remove the fabric back and seat and all
hardware, then sand and finsh the surface
as desired.
- Email me a picture of your finshed
project.
  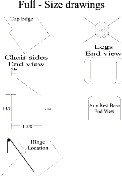
Click on the drawings, above, for hi-res
vesions.
|


 |
|