TheWoodcrafter.net
The Woodcrafter Page
Copyright © 2004.
My Basic Projects
The Retro Section
Jr. Woodcrafter
My Work
Detailed Plans
About
Lathe Work
Safety
Hints
Pic Gallery
Links
Search
Home
Birdhouses
Guest Book
Contact Us

The Woodcrafter Page© 2004 - all rights reserved.
 
Ad space available here.


Childs Chair Swing

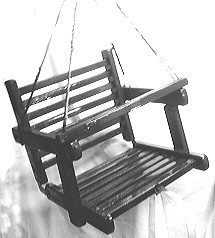
Here is a real favorite. This chair swing is a popular project for Grandpa to build.
The seat can be folded up for storage when the Grandkids are back home.
******* CAUTION *******
Never leave a child alone in this, or any other, swing.
This swing can flip over if the ropes are not secured properly or the child leans too far forward.
Test for stability before use and check out my page on safety before starting this project.
You assume all liability in the use of this product if you build it.
******* CAUTION *******

There are only five basic parts in this swing. All but the seat slats are cut from 3/4" stock. The slats are cut from 1/2" stock. Use a strong hardwood such as Maple or Hickory.

Cut out all the parts as indicated in the drawings. Sand all edges to a smooth round shape. Drill 1/4" diameter holes in the exact center of the end of every slat (parts C & E). Drill the 1/4" diameter holes in part D and parts F for the supporting ropes as indicated by the dotted lines in detail I of the drawings.
Mark the center for eight holes in each seat bottom rail (parts G) centered across the 1-1/2" width placing the first mark 1/2" from the front edge and each subsequent mark 1-3/8" from the previous mark width (see detail H). Drill 1/4" diameter holes at each mark.
Mark the center for seven holes in each seat back rail (parts A) centered across the 1-1/2" width placing the first mark 1/2" from the front edge and each subsequent mark 1-3/8" from the previous mark (see detail H).

Dowels glued into slats.

Back slats ready to be glued into side rail.
Drill 1/4" diameter holes at each mark. Dowel, glue, and clamp the slats into the side rails as indicated in the drawings and the picture to the left. The 3/4" x 3/4" slat goes into the first hole (1/2" from edge) on the back and the seat.
Parts D & B will be attached to parts A & G, respectively, with 1-1/2" long 3/8" diameter carriage bolts. Locate the holes as indicated in the drawings then drill a 1/8" pilot hole in each location.
Drill a countersink hole in parts A & G. This hole must be wide enough to allow you to tighten the nut onto the bolt and deep enough to set it flush into the wood. No parts should stick out. The thickness of the washer will prevent the carriage bolt from protruding beyond the nut. Use only self-locking nuts. in parts A & G. Drill each 1/8" pilot hole to a 3/8" hole.

L bracket mounting.
Bolt Parts D to A and Parts B to G with a flat-washer spacer between each piece. Tighten until the parts are fairly snug but not make them too tight to allow the parts to 'fold up'. Attach one 2" x 3" 'L' bracket to each side of the seat back with two 3/4" round head screws in the position indicated then secure the back to the seat using a single 3/4" round head screw on each side as indicated. Attach the parts D & E together on each side with the other 2" x 3" 'L' bracket using four 3/4" round head screws. To fold the swing for storage later, remove the screw indicated in the picture to the left.
Attach the supporting ropes securely. The best way is to use a rope 'fid' and weave the rope into a large loop as shown to the left. Many packages of rope come with a fid and directions on its use. The front ropes goe through the hand rail (part D) then the arm rest (part F). You should also add a cloth ot vinyl 'crotch strap' between the front seat slat (part C) and the hand rail (part D) for additional safety. Secure the strap to the slat and use a tie or snap to fasten it around the hand rail.
* * * * Click on the picture above to download a higher resolution picture. * * * *

*********** WARNING***********
Read my page on safety before building this item.