|
|
|
The Woodcrafter Page© 2004 - all rights reserved.
|
|
|
|
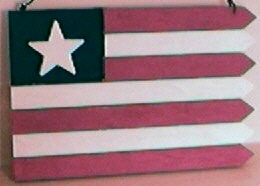
Here's a really nice
patriotic flag banner.
As a retired US Air Force officer (and a NYC resident), I
am proud to offer this project.
Flag Banner.
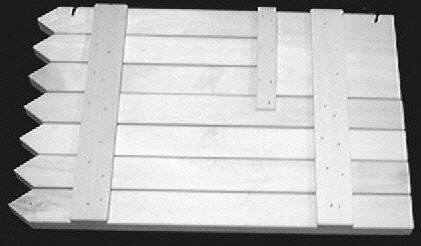
A view of the back
supports. |
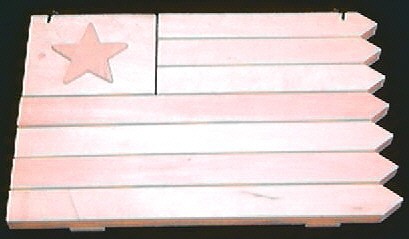
This is a very simple project that
makes a very nice patriotic decoration.
It is constructed completely from scraps.
Plywoods can be used but your banner will
not weather as well if constructed of
plywood instead of a solid wood.
1/2" planking is the best choice but
2" x 4" stock works fine too. |
| Using
2" x 4" stock. |
Using
1/2" planking. |
- Start by cutting a 12"
length of the 2 x 4.
- Cut a 7-11/16" length of the
2 x 4.
- Using a planer or band saw,
resaw/reduce the thickness of
both to exactly 1-1/8".
- Cut a 45o point on one
end of each piece.
- Using a bandsaw, cut off four
1/2" thick 'slices' from the
longest piece.
- Using a bandsaw, cut off three
1/2" thick 'slices' from the
shortest piece.
|
- Start by cutting 4 pieces
1-1/8" wide by 12"
long.
- Cut 3 pieces 1-1/8" wide by
7-11/16" long.
- Clamp all seven pieces together
with one end perfectly flush.
- Cut the 45o point on
the flush end.
|
 |
Cut two 1/4" thick
support strips 1" wide by
7" long.
Cut one 1/4" thick support
strips 1/2" wide by 5"
long.
Cut one 1/2" thick square
4-1/2" by 3-3/8".
Use a building square to align
the banner pickets.
Space the pickets with #8
finishing nails (or
similar).
Use exterior grade white glue and
1/2" long brads to secure
the supports to all the front
parts.
The two long supports fit about
1" in from each end of the
banner.
The short support fits between
the square and the the three
upper waves.
Optional - print out the template
of the star and tape it to a
1/4" thick scrap then cut it
out. |
|
 |
| |
| Click on the drawing
above to download a larger picture. |
| |
|
Detailed
Instructions
***********
WARNING***********
Read my page on safety
before building this item.
Materials needed:
1 plank, 8" wide by 24" long,
1/2" thick.
40 brads, 1/2" long.
Exterior grade carpenter's glue.
Exterior grade enamel paints (Red, White & Blue, of
course.)
Construction:
| Using
2" x 4" stock. |
Using
1/2" planking. |
- Start by cutting a 12" length of the
2 x 4.
- Cut a 7-11/16" length of the 2 x 4.
- Using a planer or band saw, resaw/reduce
the thicknes of both to exactly 1".
- Cut a 45o point on one end of
each piece.
- Using a bandsaw, cut off four 1/2"
thick 'slices' from the longest piece.
- Using a bandsaw, cut off three 1/2"
thick 'slices' from the shortest piece.
|
- Start by cutting 4 pieces 1" wide by
12" long.
- Cut 3 pieces 1" wide by
7-11/16" long.
- Clamp all seven pieces together with one
end perfectly flush.
- Cut the 45o point on the flush
end.
|
Cut two 1/4" thick support
strips 1" wide by 7" long.
Cut one 1/4" thick support strips
1/2" wide by 5" long.
Cut one 1/2" thick square
4-1/2" by 4-1/2" for the union.
Use a building square to align the banner
pickets.
Space the pickets with #8 finishing nails
(or similar).
Use exterior grade white glue and
1/2" long brads to secure the
supports to all the front parts.
The two long supports fit about 1"
in from each end of the banner.
The short support fits between the union
and the three upper waves.
Once the glue is dry, remove the nails
used for spacing.
Sand the all edges to eliminate all rough
or sharp points.
Sand the face to a smooth - flat surface.
Optional - glue and nail the star into
the center of the union.
Paint the banner with exterior grade
enamel paints and display with pride. |
|
***********
WARNING***********
Read my page on safety
before building this item.
|