| TheWoodcrafter.net |
 Copyright © 2004. |
| My Basic Projects |
| The Retro Section |
| Jr. Woodcrafter |
| My Work |
| Detailed Plans |
| About |
| Lathe Work |
| Safety |
| Hints |
| Pic Gallery |
| Links |
| Search |
| Home |
| Birdhouses |
| Guest Book |
| Contact Us |
|
|
||||||||
|
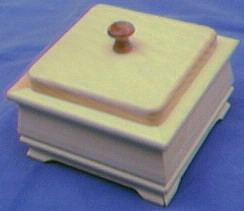
Jewelry Box
|
 |
||
 |
Simply click on each of the
drawings to open, or download, a larger version. First, cut the 1/8" groove along the bottom of the molding exactly 1-7/8" from the top edge (see drawing above). You can use either a router or a circular bladed saw (with a 1/8" wide blade) but it must be an accurate and true cut. Next, cut out the four box sides, with 45o mitered corners, making sure the inner dimension of the cuts are at exactly 3-1/2". The outer length will vary, with the molding thickness (as indicated in the drawings above and left). Now, create the corner feet by removing the curve as indicated above. This cut is 1/2" deep. |
||
| Cut a piece of 3/4" thick
stock to 4" by 4" for the lid. Make a
cut 11/32" deep and 1/4" tall along all
four sides of the lid (as
indicated in the drawing to the right) then
use your disc or belt sander to generously round
the corners. Use a 1/4" round-over router bit along the top edges of the lid to finish shaping it (as indicated in the drawing to the right). |
 |
||
 |
Cut a piece of flocking, or good
quality felt, to 3-5/16" by 3-5/16" for
the inside of the lid and another to 7-1/2"
by 7-1/2" for the inside of the box. Remove
the 1-3/4" squares from each corner as
indicated in the drawing to the left. Use an
exacto knife and a metal straight edge to score
the back side of the flocking, along each side,
to allow it to bend more easily and to guide the
placement of the bends. Locate a suitable small knob for the lid. trim the dowel insert on the knob to 1/2" if it is longer than 1/2". |
||
| The Jr Woodcrafter will need a
hand drill and the proper size bit(s). The holes
need to be the proper size for the knob you have
selected. It may be best to drill a pilot hole
first (about 1/8"). You may wish to drill
the hole in the lid and not allow the Junior
Woodcrafter to drill in order to ensure a better
looking final project. (Delete
steps 1-3 of the directions.) Now all your Junior Woodcrafter needs is the six wood pieces, the knob, the two pieces of flocking, two wide rubber bands, a roll of masking tape, the directions, a hand drill, drill bit(s), one sheet of 150 grit sandpaper, a really cool workshop apron small enough for kids, and safety goggles. |
|||
Construction. |
|||
| 1. Locate the center of the top of the lid by
using a straight edge to draw light pencil lines
from corner to corner (as sown in the drawing to
the right). 2. Drill a 1/2" deep hole in the center by using the smaller drill bit (1/8"). Be careful to NOT drill all the way through the lid. 3. Sand all the inner edges of the sides to a smooth finish. 4. Apply glue to one end of one side then stand it upright and glue it to another side to form a n L. |
 |
||
| 5. Apply glue to one end of
another side then stand it upright and glue it to
the last side to form another L. 7. Apply a light bead of glue into the grooves in the bottom of each side. 8. Slide the bottom piece (smooth side up) into the groove formed by the first two sides. 9. Apply glue to the two exposed ends of one L. 10. Slide the other L into place with the bottom fitting into the groove. |
 |
||
| 11. Place the two rubber bands
around the sides to hold everything in place
while it dries. 12. Apply a thin layer of glue to the back of the remaining flocking, fold it along the precut lines, and slip it into the box being careful to not spread glue on the top edges. Wipe off any excess glue. 13. Use short pieces of the masking tape to keep all the top edges of the flocking flat against the inner surfaces. 14. Turn the box upside-down to keep all the top edges flush. 15. Check the corners to make sure all corner edges are meeting flush. 16. Sand all surfaces of the lid to a smooth finish. 17. Apply a small amount of glue into the hole in the lid and insert the knob into the hole. Wipe off any excess glue. 18. Apply a thin layer of glue to the back of the flocking for the lid and place it on the inner surface. 19. Place the lid flat on the table and weight it down with a book to make sure the flocking glues flat to the lid. 20. Once all glue has dried, place a large piece of sandpaper on a flat surface and sand the feet level. 14. Sand all remaining surfaces and edges to remove all sharp corners and smooth all surfaces. You may wish to finish the entire box by spraying on a clear protective finish. |
|||
| * * * * Click on any picture above to download a higher resolution picture. * * * * |
*********** WARNING***********
Read my page on safety
before building this item.